Dinosaur National Monument + Rocky Mountain National Park: Trail Ridge Road

Let me come right out and say it: Dinosaur National Monument was not a destination high on our travel list. Like Mesa Verde, it was an afterthought of the we’re passing through, so why not? variety. Honestly? My expectations were embarrassingly low.

Oh, we of little faith! Because National Monument and Park status is not something so glibly conferred. Still, it took a Dinosaur National Monument visit to eradicate my heretical leanings once and for all. Spoiler alert: this unassuming park delivered in big and unexpected ways!

Salt Lake City

Summer 2015 began with a six-hour red-eye to Salt Lake City that sounded good in theory–cheap tickets with an early-morning arrival, allowing for a full day of SLC exploration. Turns out a 3 am (Hawaii time) touchdown makes for some very grouchy kids–and testy parents. Oops! Oh well, at least we got the cheap tickets part right. Luckily, the kids caught their second wind at Park Cafe. Trip Advisor nailed this SLC breakfast recommendation right: thick-cut slab bacon, in-house strawberry jam, and homemade hash that delivered beautifully in the surface area to crisp edges ratio department. Bountiful portions kept our hungry brood plenty satisfied.

From Park Cafe, we headed to Temple Square for a glimpse into the heart and history of the LDS organization. Regardless of religious affiliation, Temple Square represents a triumph of both architecture and the human spirit. It is easy to appreciate the immaculate grounds and reverent beauty found here. We spent the better part of the afternoon wandering Salt Lake Temple, the Family History Library, and LDS Conference Center. The Tabernacle, in particular, harkened back to childhood memories of watching the Mormon Tabernacle Choir perform around an old rotary-knobbed Magnavox on Christmas Eve (Whew, dating myself big time here. Anyone else remember standing up to change the TV dial? Bueller?).

IMG_20150625_133905
Afternoon walking tour through SLC

Melt-in-your-mouth pastrami burgers and creamy fry-dipping sauce from Crown Burgers made for a tasty early evening pick-me-up before a 3-hour drive east to Vernal. If you like pastrami, you’ll love this SLC institution! Vernal is a fun little town–a quirky, kitschy mishmash of dinosaur-themed memorabilia and potted flower-lined streets. Even the gas stations sport fun dinosaur statues. With two weeks of camping ahead of us, we happily splurged on a motel and settled in for the night.

IMG_20150625_140726
Crown Burgers with special fry sauce (It’s probably just mayo and ketchup, but I swear the stuff is like crack with that pastrami burger!)

Dinosaur National Monument

Dinosaur National Monument straddles the border of Utah and Colorado, sheltering a dinosaur fossil hotbed in Vernal and winding through dramatic canyon country in Colorado. Both regions are stunning. Unfortunately, we only had time for half a day in Vernal but earmarked both ends of the park for a return visit.

A quick stop at the Quarry Visitor Center gave us time to view the park film, pick up Junior Ranger booklets, and hop on the summer shuttle to Quarry Exhibit Hall a quarter mile away. Recently renovated, the Quarry Exhibit Hall was truly magnificent! The structure itself contains glass-paneled walls that allow you to see for miles into the quarry, but what is even more impressive is the fact that the building houses over 1,500 dinosaur fossils in relief. In the early 1900s, paleontologist Eric Douglass envisioned housing the exposed bones in relief, suggesting that such a site would inspire more awe than excavating the fossils. He couldn’t have been more right. With skeletons left untouched and exactly as they’d been discovered over a hundred years ago, we felt like paleontologists discovering this quarry for the first time. True, we were a small and biased sample, but the wonder and awe we felt walking through the display seemed to confirm Douglass’ vision. This was not some hodgepodge of bones, either; we were able to make out entire articulated vertebral columns, skulls, and Stegosaurus plates. We purchased a one-dollar guide that was invaluable in helping us identify the fossils and decipher what we were seeing; between the guide and the quarry, our youngest was in dinosaur heaven.

IMG_20150626_091719
Dinosaur National Monument, Utah 2015
IMG_20150626_094357
Riding the shuttle tram from Quarry Visitor Center in Vernal
IMG_20150626_095109
Quarry Exhibit Hall
IMG_20150626_100116
Quarry Exhibit Hall houses skeletons in relief
IMG_20150626_095653
Vertebrae in relief
IMG_20150626_095317
Comparing fossils against our reference guide

The Quarry Exhibit Hall also houses many reassembled fossil skeletons, among them a Camarasaurus discovered in Dinosaur. An interactive Junior Ranger Talk gave the kids an opportunity to touch dinosaur bones, test their knowledge of Jurassic trivia, and emulate dinosaur gaseous emissions with balloons–a hilarious activity that proved you’re never too old to find balloon flatulence amusing. 😀

IMG_20150626_100339
Dinosaur National Monument
IMG_20150626_101547 (1)
After striking out on fossils at California Academy of Science, he was so happy to see assembled dinosaur skeletons here
IMG_20150626_101333
Informing the vision behind Quarry Exhibit Hall
IMG_20150626_105010
Blowing balloons to emulate dinosaur flatulence
IMG_20150626_105037
Flatulent balloons never get old

In a state that boasts the Mighty Five, it’s easy to see how a park like Dinosaur might get overlooked for top billing. But perhaps it’s precisely Dinosaur’s quieter nature that makes it feel like such a find. We only had time to hike 1.2-mile Fossil Discovery Trail before our shuttle arrived, which is a shame because Dinosaur National Monument looks to have some incredible trails. We’d love to tackle more hikes as well as camp or river raft through the park someday. Kids or no, I suspect we all harbor some secret seven-year-old dinosaur zealot deep within. Call me corny, but there’s something nostalgic about reigniting that dormant zest at Dinosaur National Monument.

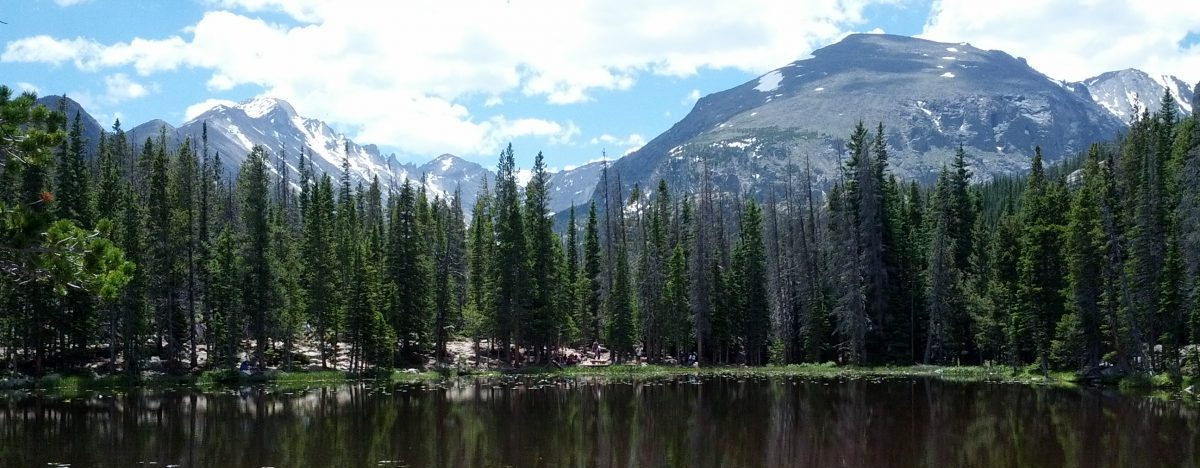
Rocky Mountain National Park: Grand Lake to Estes Park via Trail Ridge Road

From Quarry Visitor Center, we drove four hours east to Kawuneeche Visitor Center in Grand Lake, Rocky Mountain National Park. Coming from triple digit temps in Dinosaur, we found ourselves reaching for jackets to stave off the cold in Grand Lake. With a quick stop to view the park film, admire elk, and play with roadside snow, we ascended Trail Ridge Road.

Trail Ridge Road is a spectacular 48-mile stretch of highway spanning the heart of Rocky Mountain National Park and linking Grand Lake in the west with Estes Park in the east. Crossing the Continental Divide, Trail Ridge Road traverses alpine tundra at dizzying elevations of over 12,000 feet. The drive begins like any other in the Rockies–evergreens and forest views–but within minutes, Trail Ridge Road redefines itself as something else entirely. Pine forests yield to wind-sheared firs and then barren sky as you climb above the clouds–a literal expression, not a figurative one. Here in the vast alpine tundra, clouds mist across the road, cloaking snowy peaks below. Devoid of trees, the Rockies seem to go on forever, just one immense fourteen-footer after another. It is impossible not to be moved by the enormity of it all.

Spotting a herd of elk grazing amid the clouds, we felt certain we were at the top of the world. It wouldn’t have been such a stretch given the rising altitude and thinning oxygen. Where else but at the top of the world could you find startlingly stark beauty like this?

IMG_20150626_174048 (1)
The ascent…climbing into the clouds
IMG_20150626_173502
The views keep getting better and better
IMG_20150626_173835
From up in the clouds, those 14-ers look like little hills
IMG_20150626_174806
Turning a curve to see this herd in the clouds was amazing
IMG_20150626_174822 (1)
We sat here for quite a while admiring these beautiful elk
IMG_20150626_175156
Trail Ridge Road, 2015

With daylight fleeting, we were disappointed to make a hasty descent to Estes Park and Jellystone Campground, our home for two nights. With the beauty of Trail Ridge Road still fresh in our minds, we were excited to see what Rocky Mountain National Park held in store for us at Emerald Lake and Mount Ida the next day. For now, though, it was on to more pressing matters, like dinner and s’mores and the adorable bunny who so graciously allowed us to share his charming home.

IMG_20150626_200407
The adorable bunny who shared his campsite with us for two days, Jellystone Estes Park


3 Days in Arches: 7 Family-Friendly Hikes + Whitewater Rafting Fisher Towers, Part II

“It’s a high water year, folks. You’re in for a treat,” our guide assured us with a grin.

Gangly and angular, our guide’s arms hung disproportionately long in a way that no respectable non-teen’s should. The kid couldn’t have been a day over 18. What little faith I’d staked in the skimpy life vest strapped around my neck vanished the moment he uttered, “Dude,” like he was doing some bad Keanu Reeves “Bill and Ted” impression–only clearly, he wasn’t. He clapped a jovial hand to my shoulder. “Duuude. This is going to be some ride.”  

This is how Day 3 of our Arches National Park adventure began. Road Trip 2014 took us through 9 National Parks and 6 states with a Colorado River whitewater rafting trip serving as a highlight and splurge we’d carefully budgeted for. Only now, standing in a Moab parking lot being fitted for life vests, I was sort of wishing we’d sprung for a safe little float trip instead. You know–calm. Mellow. Post-pubescent guide.

We jumped into a rickety jeep sans seatbelts and zipped off to our put-in site near Fisher Towers, 45 minutes away. While our Canyonlands by Night and Day guides chirped about the myriad ways we could potentially die on this tour (waivers, liability, blah, blah), I had time to contemplate how little I cared for adrenaline rushes and how fond I’d grown of breathing. With warm gusts making bird nests of our hair, we cruised down the highway to a rash of exuberant high-fives and Lynyrd Skynyrd blaring from the front-seat boom box.

Nodding along to the beat, our guide explained how high water had turned our heretofore Class I and II section of the Colorado into more sizeable Class II and III rapids. He winked at our youngest–a hair over three feet and 30-some-odd pounds–small fry by any standard.

“You ready to hang tight and get wild, little guy?” he said, reaching across the seat to muss our son’s hair. He studied the life vest dwarfing our youngest’s face, clearly a size or two too large despite falling within the recommended age range for this trip before turning to me.

“He can swim, right, Mom?” he asked, almost as an afterthought. “I’m kidding,” he deadpanned.

Once at the put-in site, we learned that the guides would lead four separate tours. As a party of five, we were assigned own raft and guide–ours being the gangly teen with the lashes and curly locks girls would kill for, of course. With a trademark grin, he threw gear into our raft–extra life vests, a first aid kit (“You’re a Scout mom; you know how to use this thing, right?” he said with a wink), Tevas, sunscreen–and chatted up the kids about school and Scouts and Arches. I’ve no doubt the conversation seemed natural because he was young enough to be their older brother, but I was grateful for his easy rapport with the kids. “Relax, Mom!” he said to me more than once. “I promise you, this is going to be so much fun.”

IMG_20140615_090353-SMILE
At Fisher Towers, getting rid of pre-ride jitters
IMG_20140615_090851
Our put in site, 45 mins from Moab
IMG_20140615_112438
Enjoying a breather without life vests

And oh, did we have fun! Despite my initial misgivings, our first-ever whitewater rafting adventure turned out to be a true trip highlight for us. Our guide explained how to lean into the center of the raft through the rapids and how to angle our bodies if we fell in. Boy, were we surprised to learn we’d be sitting on the edge of the raft and not inside it! Our guide expended all his elbow grease rowing while we focused on gripping that raft line for dear life. Being on the water was calming, however, and it wasn’t long before we found ourselves savoring the unique perspective the river provided: orange sandstone climbing toward the sun, the Colorado River snaking into the horizon. Our guide regaled us with brushes with celebrity–”Bon Jovi rented out that sandstone tower to film his music video!” (“You weren’t even alive when that video came out,” I quip; his smile concedes it’s true)– and Moab trivia. It was all so calm and un-rapids-like that we were lulled into thinking that maybe this was the extent of the ride.

IMG_20140615_092434
In which we find out we’re sitting on the edge of the raft, not in it!
IMG_20140615_095115
This view made everything better
IMG_20140615_102409
View from the raft, Fisher Towers 2014

But this was a whitewater rafting tour after all, and it was just a matter of time before our ride turned bonafide wet and wild. From around the bend, Onion Creek Rapids looked like little more than gentle froth, but the sly grin on our guide’s face told us otherwise. “Lean in!” he hollered, paddling directly into the effervescent white. With a whoop and an explosive geyser-spray that drenched us head to toe, we were off! The raft rocked wildly to and fro, battered about by the swirling eddies. We ebbed and crested for what felt like minutes; at one point, I could swear the raft leapt right out of the water. The kids screamed with delight, Mom loudest of all.

“Again! Again!” the kids shrieked. We couldn’t get enough of the frothy white stuff, urging our guide to maneuver a long path through the next set. It was equal parts thrilling and terrifying in the most addictive of ways. I could see why people did this year after year. I wasn’t sure I’d ever have the guts to hoist myself back into a flimsy raft after this, but man, was it ever a rush. We floated through Fisher Towers with eagle eyes peeled for whitewater, screaming and laughing like loons every time our raft went flying through the air. Before we knew it, we were on the edge of the last rapid, our 3-hour ride all but over. Our guide was awesome, prolonging the ride as best he could by not paddling. Rapids being rapid, however, we were soon in the shallows and docking along the river bank. We’d had an absolute blast–I can’t recommend Canyonlands by Night and Day highly enough! If whitewater rafting isn’t your thing, Canyonlands by Night and Day also offers jet boat tours, zip lines, and ATV tours in the area.

IMG_20140615_094639
Holding on for dear life and having a blast
IMG_20140615_102203
In between rapids, the kids got a chance to row the raft
IMG_20140615_094610
The calm before the rapids
IMG_20140615_110643
The frothy white good stuff!

After a bumpy jeep ride back to the company office in Moab, we spent the rest of the afternoon hiking in Arches. Hikes #1-5, including Landscape Arch, Double O, Balanced Rock, Double Arch, and Delicate Arch, may be found here.

  • Hike #6 Windows + Turret Arch: This easy 1.2 mile trail brought us up close and personal with North and South Windows and Turret Arch, all of which can be readily viewed from the road. What’s the point of hiking when you can easily see these arches from the road, you ask? Well, everything, really, and perspective, mostly. There’s something both humbling and sacred about being in the presence of these temporary giants. It’s a feeling that can’t be replicated from the car. To clamber up boulders at the base of an arch or lay in the shade of a multi-ton wrinkle-in-time is to know the immense awe of these natural wonders. Arches does a fantastic job of maintaining the accessibility of this trail, making it perfect for kids and adults of all ages and abilities.
    IMG_20140614_123233
    North and South Windows; note the line of people ants ascending the base!
    IMG_20140614_114250
    Easy trail to the Windows
    IMG_20140614_114702
    Not quite sure how this became our universal Arches pose 😀
    IMG_20140614_115052
    The kids completed their Junior Ranger booklets under this arch
    IMG_20140614_122106
    Turret Arch looks small from a distance
    IMG_20140614_122216
    But grows larger and larger the closer you get

    IMG_20140614_122619
    …And larger still! We’re the colorful specks at the base of Turret Arch
  • Hike #7 Park Avenue: This moderate 2-mile out-and-back trail evoked a skyscraper-lined cityscape hewn from stone. The steep descent toward the Courthouse Towers made for a moderate return climb under afternoon sun, but this is a very doable hike for littles if timed properly. The Three Gossips was our favorite formation by far, capturing our imaginations with its uncanny resemblance to a conspiring threesome. With formations like the Organ, Sheep Rock, and Tower of Babel, Park Avenue Trail is sure to spark your imagination, too.
    IMG_20140615_132741
    Park Avenue is such a fitting name for this trail
    IMG_20140615_133137
    Wandering Park Avenue after whitewater rafting
    IMG_20140615_140532
    Looking up, you really get a sense of how enormous these formations are
    IMG_20140615_135817
    My three silly gossips!
    IMG_20140615_134927
    The OG Three Gossips
    IMG_20140615_133915
    Exploring Park Avenue; it’s hard not to feel little here

    IMG_20140615_135859
    Arches 2014
  • Bonus birdwatching hike in Scott Matheson Wetlands Preserve: Located less than ten minutes from the entrance to Arches, this lovely one-mile boardwalk loop meanders through fragile wetlands providing sanctuary to more than 200 species of migrant birds. While spring and fall might prove more fruitful for spotting seasonal migrants, our time in the Preserve was unfortunately a bust. We enjoyed exploring the informational kiosk and shaded gazebo, but afternoon summer heat rendered any potential bird activity non-existent. Still, this peaceful stroll through lush wetlands was like striking oasis gold amid Moab’s ubiquitous desert red rock.  
    IMG_20140614_151356
    Beating the heat at Scott Matheson Wetlands Preserve

    IMG_20140614_151415
    On the trail; no luck this time with the birds                   

Hikes are short and sweet in Arches, making this sandstone playground imminently accessible to both young and young-at-heart alike. With a bevy of great trails to choose from, a daily six-mile cap proved key in keeping our five-year-old (and thus mom and dad!) sane and happy. A three-day timeline worked well for us, allowing for leisurely hiking and ample time for fun extras like swimming. Your mileage may vary (pun intended, groan!)–families with older kids or hardier littles might easily squeeze these hikes (and then some) into a single day.

My one regret? Missing the Fiery Furnace ranger-guided tour. Exploring Fiery Furnace without a guide is allowed, but I think we’ve all seen “127 Hours”–um, no solo off-the-grid hiking for me, thanks! I hemmed and hawed over our youngest’s skill level and safety for this hike and missed our window of opportunity; I’ve been kicking myself ever since. These tickets sell out fast, so don’t let my mistake be yours: snatch them up and reconsider later–you can always return them if need be. Whether you’re a thrill-seeking adrenaline junkie or first-time hiker, Arches offers something special for everyone. Linger a while, and let yourself be moved.

Also from Road Trip 2014: Bryce Canyon, Canyonlands, Zion, Mesa Verde 

3 Days in Arches: 7 Family-Friendly Hikes + Whitewater Rafting Fisher Towers, Part I


A few years ago, I picked up a well-loved, second-hand copy of Time Magazine’s “America’s National Parks” at a library book sale. Call it kismet: I’d mistakenly yanked the book off the shelf thinking it was a Hawaii hiking guide. Our youngest was still in diapers, and we’d yet to embark on a single road trip or visit any National Park other than Hawaii Volcanoes or Haleakala. Flipping through the pages, though, I was spellbound. Smack dab in the center of the book was a sunrise photo of Delicate Arch in Arches National Park. I didn’t know how, and I didn’t know when, but I promised myself there and then that we’d be standing at Delicate Arch someday.

Three years later in 2014, we took a leap of faith and planned a Southwest National Parks road trip. Our youngest was only five, and we weren’t sure how he’d fare with all of the hiking and driving, but we’d had a taste of Mount Rainier and Redwood in 2013 and found ourselves craving more. It was a challenging itinerary–9 parks in 18 days towing 3 littles over 3,000 miles–but 2014 holds a special place in our hearts as our first in-depth Parks experience. If we were smitten before, we were head-over-heels this go-round!

We visited Grand Canyon and Mesa Verde before stopping at Arches for 3 days. With a quick stop at the Visitor Center to view the park film and exhibits, we spoke with a park ranger regarding trail conditions and Junior Ranger booklets. Our youngest was especially thrilled to borrow a Junior Explorer bag. With binoculars, a jeweler’s loupe, colored pencils, field guides, and an activity binder, this backpack was free to borrow and held our youngest’s rapt attention throughout our stay. After participating in a kid-geared Ranger Talk (Highly recommend! We love Ranger Talks and try to squeeze in as many as we can), we set out to explore:

  1. Landscape Arch (1.6 miles + 0.5 miles more for Pine Tree and Tunnel Arches): From the moment we stepped foot in Devil’s Garden, the striking terrain was like none we’d experienced before: orange sandstone against the bluest of skies, miles of desert sand giving rise to wild green junipers. It was a divine master class in complementary colors and textures. The trail itself was relatively flat with minimal elevation gain; gravel and sand underfoot made Landscape Arch accessible to all. At 290-feet long, Landscape Arch ranks among the five longest arches in the world, but what is perhaps more impressive is its improbable width. Impossibly long and thin, this oxymoron of a spindly mammoth seems to defy the laws of physics.
    IMG_20140613_122312
    Beginning of Landscape Trail in Devil’s Garden
    IMG_20140613_124246
    I love this photo, if only for the sibling love
    IMG_20140613_124252
    Utah’s summer skies are the brightest and bluest I’ve ever seen
    IMG_20140613_124303
    The color contrasts and sandstone formations on this trail were amazing!
    IMG_20140613_150010
    Landscape Arch, 2014
    IMG_20140613_150254
    I know it’s horrible to shoot into the sun, but I loved the head-on angle here

    Unfortunately, it was 94 degrees the day we visited, and our youngest had no intention of hiking another four miles, so we divided and conquered: the hubby took the youngest an extra half-mile to Pine Tree and Tunnel Arches (which they loved), while the older two and I continued on to Double O Arch.

    IMG_20140613_135325
    Hanging out at Pine Tree Arch

    IMG_20140613_134627
    Tunnel Arch, 2014
  2. Double O Arch (additional 3 miles RT from Landscape Arch + 1 mile more for Partition and Navajo Arches): The trail becomes significantly more challenging after Landscape Arch. The gravel and sand trail morphs into steep inclines, slickrock scrambling, and narrow fins. While doable for older children (ours were 9 and 11), parents should exercise caution as this primitive trail contains steep drop-offs and areas of exposure. We lost the cairn trail several times, but hiking to Double O was worth every ounce of effort. The Disneyland crowds vanished the minute we left Landscape Arch, affording us blissful solitude the entire way.
    IMG_20140613_131036
    The Primitive Trail is steeper and more rugged than Landscape Arch trail.
    IMG_20140613_135221
    Final fin before Double O (note the brave soul standing atop the fin for scale)

    The kids enjoyed climbing the endless slickrock until the final fin to Double O when the wind suddenly picked up. Sand whipped into our eyes, and we dropped to all fours as persistent gusts threatened to knock us from our narrow perch. Low-pitched wind howled through rock wall tunnels, adding to the eeriness of the experience. Several parties ahead of us turned back, urging us to do the same for the kids’ safety. Being stubborn, we soldiered on for a few minutes until a rogue gust nearly knocked the kids off a narrow fin. Pride goeth before a fall, and I wasn’t sticking around to lose a kiddo to hubris. While disappointed to turn back so close to Double O, we were happy to have at least caught a glimpse of the overlook. Turning back turned out to be serendipitous as our favorite Arches experience occurred at Partition and Navajo Arches on our return trek. Partition Arch in particular framed an insanely gorgeous vista at a dizzying elevation. There were shaded shelves on either side of the arch that made for lovely impromptu sketch studios; moved by the spirit and beauty of Arches, we journaled here for close to an hour.

    IMG_20140613_143832
    Navajo Arch: we had this one all to ourselves. Strong winds made bonsai out of these trees!
    IMG_20140613_141126
    The partition in Partition Arch
    IMG_20140613_140912
    We couldn’t get enough of that arch-framed vista
    IMG_20140613_142341
    One of my favorite moments at Arches

    IMG_20140613_142538
    Lovely shaded spot on the opposite side of Partition Arch for journaling
  3. Double Arch (0.5 miles): Though tuckered out from Landscape and Double O Arches, the kids caught their second wind at Double Arch. A gentle half-mile stroll led us to the base of this spectacularly intertwined behemoth. We lay humbled beneath Double Arch and watched clouds roll by before climbing out as far as we could along the sandstone ledges. Though you could easily check Double Arch off your list in half an hour, we loved lingering here. Exploring every nook and cranny fostered an intimate sense of connection to the park; the kinesthetic and visceral connections forged here remain strong for the kids to this day. Our youngest still talks with affection about exploring Double Arch with his jeweler’s loupe!
    IMG_20140613_161557
    Double Arch Trail. This structure reminded us of Tatooine.
    IMG_20140613_162059
    Beneath Double Arch
    IMG_20140613_162308
    Looking out from under Double Arch. I could never get tired of this view!
    IMG_20140613_162524
    We sat here for over an hour, watching the clouds roll by
    IMG_20140613_163449
    We can’t recommend the Junior Explorer bag enough–free to borrow and sure to keep littles engaged for hours
    IMG_20140613_162647
    Exploring Double Arch

    IMG_20140613_162302
    The trail back is almost as beautiful as the arch itself
  4. Delicate Arch (3 miles): Though NPS classifies Delicate Arch as difficult, most families would probably find it more moderate. There is a 200-yard ledge near the end with drop-offs, but not to the degree or sketchiness of Double O Arch. Traversing the rocky terrain is safe and doable for even the youngest of hikers if taken slow. With a 7 am start time on Day 2, trailhead parking was plentiful, and we were able to avoid the previous day’s soaring midday temps. The landscape evoked “John Carter’s” arid slickrock glory, offset only by Utah’s endless blue skies. Long, rocky inclines allowed the kids to choose their own path between cairn markers, making for a memorable experience. Rocky inclines gave way to spiraling rock stairways, eventually yielding to a narrow ridge pathway boasting multiple arch sighting opportunities across the valley (keep your eyes peeled!).
    IMG_20140614_084310
    Hiking Delicate Arch, 2014
    IMG_20140614_075941
    Our youngest was 5 at the time and loved this trail!
    IMG_20140614_083645
    These desert views never cease to amaze me
    IMG_20140614_083706
    With gorgeous rest stops like these, it was tempting to linger a while
    IMG_20140614_084838
    Picking a path between cairns. The cloud-cover was disappointing at first but such a relief temperature-wise
    IMG_20140614_085850
    Final push to Delicate Arch–I spy 2 arches across the valley

    No matter how many times I’d dog-eared that Time Magazine page or read online about how the arch appears right after this ledge, nothing could prepare me for that first glimpse of Delicate Arch. At over 60-feet tall and 40-feet wide, Delicate Arch holds top honor as the park’s largest freestanding arch, but here’s what mere photos and statistics cannot convey: Delicate Arch is huge. And glorious. And fleeting–a temporal blip in a scheme of eons. It dwarfs and humbles you; you can’t help but contemplate time and tide and the transient nature of existence. On your return trek, be sure to take the short spur trail to Wolfe Ranch Cabin to see an early turn-of-the-century ranch building as well as intricate and well-preserved Ute petroglyphs.

    IMG_20140614_090612
    Delicate Arch 2014
    IMG_20140614_090413
    Three years after marking that Time Magazine book, we’re here at Delicate Arch! It was a surreal moment.

    IMG_20140614_092658
    Delicate Arch. The people at the base of the arch give a sense of scale–Delicate Arch is so much bigger than I’d imagined.
  5. Balanced Rock Loop (0.3 miles): More gentle stroll than hike, kids and adults alike will enjoy walking the circumference of this gravity-defying icon. Studying Balanced Rock from multiple angles gave us a true appreciation for its precarious size and structure. Stay tuned for hikes #6 and #7 and whitewater rafting at Fisher Towers in Arches, Part II!
    IMG_20140614_131547
    Balanced Rock is a sight to behold
    IMG_20140614_132030
    We loved studying Balanced Rock from different angles
    IMG_20140614_130824
    From this angle, Balanced Rock looks exceptionally sturdy

    It’s hard to articulate just how much that little 50 cent book from the book sale changed our lives. In the years since, we’ve visited 21 National Parks and hope to visit 12 more by summer’s end. What began with a dog-eared photo and a promise has evolved to become the thread running through the fabric of our family history. The Parks are a hundred stories of bonding in the rain on the Olympic coast and trout-fishing on Yellowstone Lake and marveling over bighorn sheep on Iceberg Lake Trail. They’re stolen moments of holding hands through a Yosemite meadow and jumping at the top of the world in Mesa Verde. They’re three kids who consistently rank Park Ranger at the top of the ever-evolving list of what they’d like to be when they grow up. In no small way, the Parks have changed the way we see ourselves and the world. We are addicted!

    IMG_20140613_090239-SMILE
    The Mighty Five make Utah one of our very favorite states!


Canyonlands: Island in the Sky

With only one day to spend in Canyonlands National Park, we decided to focus our efforts on the section of the park known as Island in the Sky. Renowned for its awe-inspiring overlooks and vistas, Island in the Sky comprises one of four distinct areas in Canyonlands, including The Maze, Needles, and Rivers. Each area offers impressive solitude and rugged terrain, but Island in the Sky seemed best suited to our family’s needs, especially given its proximity to our lodging in Moab.

IMG_20140616_080238-SMILE
Island in the Sky, Canyonlands National Park

After stopping at the Visitor Center to pick up Junior Ranger packets, we headed out to Mesa Arch. We hiked the short 1/2 mile trail, enjoying the unexpected pops of orange and white desert blooms contrasted against the slickrock and dirt. I’d seen photographs of Mesa Arch before our visit and was surprised by how small it seemed in person. (Then again, we had just spent four days in Arches National Park, so my perspective was probably a little skewed.) And then I took a step closer, and the view. Oh, the view. Photographs do little justice in capturing the expansive and majestic nature of this view.

IMG_20140616_091317
Early morning, Mesa Arch, Canyonlands
IMG_20140616_090325
The view through Mesa Arch, Canyonlands National Park

From here, we took Upheaval Dome Road to Whale Rock trail, a one-mile must-do for kids and adults alike! Seeing the bleached whale in the rock requires a little imagination:

IMG_20140616_094028
Whale Rock, Canyonlands National Park

Climbing this slickrock behemoth was a highlight for our entire family. The kids loved climbing the tail and following the cairns along the whale’s back. There are even handrails near the top to aid your ascent to the spout. Our youngest had a blast testing his shoes’ traction against the slickrock, dubbing his hiking boots, “Spider Man grippy shoes.” Whale Rock may not seem all that impressive from the road, but the 360 degree view of Canyonlands from the top is stellar.

IMG_20140616_095333
Atop Whale Rock, Canyonlands
IMG_20140616_095514
Whale Rock, Canyonlands
IMG_20140616_094952
The view from atop Whale Rock, Canyonlands
IMG_20140616_095222
Ascending the spout, Whale Rock, Canyonlands

We drove a little further to Upheaval Dome and hiked the 2 mile (roundtrip) trail to the second overlook for Upheaval Dome. Geologists aren’t sure how Upheaval Dome was formed. One theory suggests that the dome was a result of a meteorite impact. A more widely accepted theory suggests that the dome was formed by the collection and expansion of salt moving upward through rock layers. The walk to the main (first) overlook is easy enough for all ages, but the hike to the second overlook involved narrow ridges and some exposure. Blustery winds can also be a concern with children here, especially in exposed areas with drop-offs.

IMG_20140616_112430
Upheaval Dome, Canyonlands National Park
IMG_20140616_105924
Blustery winds at the main overlook, Upheaval Dome, Canyonlands

We stopped and cooked lunch under a cute picnic shelter just outside of Upheaval Dome, boiling water for soup and distributing sandwich fixings. The kids worked on their Junior Ranger Packets for an hour. One thing I love about the Junior Ranger booklets is that they’re meant to engage kids for a good length of time; booklets often take hours to complete–badges are truly earned! Many questions require short answers and even essays for older children; other questions require recording sensory experiences along hikes or attending a Junior Ranger talk. All of the activities enhance kids’ experience and can help drive a park visit in a focused way if you are in need of an itinerary.

After lunch, we drove to Grand View Point Trail, located 12 miles from the Island in the Sky entrance on the main park road. From here, we hiked 2 miles roundtrip along Grand View Point Trail to some of the most stunning scenery we have ever seen. The views from this cliffside trail took our breath away.

IMG_20140616_125134-PANO (1)
Grand View Point Trail, Canyonlands
IMG_20140616_133858-PANO
View at the end, Grand View Point Trail, Canyonlands
IMG_20140616_134008
Scenery for days, Grand View Point Trail, Canyonlands
IMG_20140616_134040
On top of the world, Grand View Point Trail, Canyonlands

There were a few exposed areas, but with adult supervision, kids should do just fine on this hike. The overlook from the parking lot is great, but it absolutely dulls in comparison to the scope and view you get along the trail. Hiking Grand View Point Trail is an experience that makes you feel small and insignificant in the best possible way.

The kids had had their fill of hiking by this point, so we filled the late afternoon with stops at various overlooks.  Our final stop was the Visitor Center, where the kids turned in their Junior Ranger packets. The park ranger was fantastic and spent a lot of time checking the kids’ work and talking to them about their Canyonlands experience. I know I sound like a broken record, but if you have children, the Junior Ranger program at any of the National Parks is always well worth the time and effort.

IMG_20140616_152920
Getting sworn in as Junior Rangers, Canyonlands National Park

After a long day of exploring and hiking, we celebrated my husband’s birthday at Tamarisk Restaurant in Green River, UT. The food and service were outstanding, and the kids loved tasting chicken fried steak for the first time. With reasonable prices, great food, and friendly service, I’d highly recommend this restaurant to families traveling through the Moab area.

IMG_20140615_195158
Tamarisk Restaurant, Green River UT
IMG_20140615_195205
Enchiladas at Tamarisk, Green River, UT

Canyonlands National Park has so much to offer, I only wish I had allotted more time here so we could have explored the Needles district, too. Here are my tips for families visiting Canyonlands National Park:

  • Pack food and water: There are no restaurants or deli counters at Canyonlands. With Moab more than 40 minutes away, you’re looking at spending over an hour driving for a lunch or snack break unless you bring food with you. There are great covered picnic shelters in the park. Why not make a day of it, and enjoy your picnic lunch outside? Trail destinations make great lunch spots, too.
  • Get out and hike: Canyonlands is an easy park to see by car (ideal for those with mobility issues), but the best views and experiences can be had by hiking. Do as few or as many hikes as you like! The great thing about Island in the Sky is that most of the trails are short, 2 miles roundtrip and under–the perfect distance for little legs.
  • Participate in the Junior Ranger program: Kids and parents will learn so much more about the geology, wildlife, and plant life in Canyonlands through this program than they will from any guidebook or park newspaper.
  • “Don’t bust the crust:” Avoid straying off-trail. The soil in Canyonlands is live cryptobiotic soil composed of microorganisms that feed the plants in the park. Walking on the soil kills the biological soil crust. The NPS adopted a catchy slogan to remind visitors–don’t bust the crust!


Zion National Park: Hiking the Narrows

While horseback riding in Bryce Canyon, I got to chatting with another mom who had just come from Zion National Park. As luck would have it, we were headed to Zion, too–that afternoon, in fact–so I asked her for suggestions. Her one and only piece of advice?

Hike the Narrows.

“If you do only one hike in Zion,” she said, “make it the Narrows.” I’d read about the Narrows prior to our trip but had decided the hike would be too challenging for our youngest, who was only six at the time. I told the friendly mom that we planned to do the Riverside Walk instead, a one mile loop that leads to the mouth of the Narrows. “No,” she insisted, “your kids will be fine. Trust me: you need to do the Narrows.”

I listened with fascination as she told me about the outfitter her family had rented neoprene socks and hiking sticks from. I asked her questions about the water depth and temperature. Were there natural stopping points, or was it all river, all the way? Would we able to get the full effect even if we were only able to hike 3 or 4 miles in? (Spoiler alert: a resounding “yes” is the answer to both.) She reassured me that hiking the Narrows–even if it meant not seeing as much of the park as we’d previously planned–would be the single best decision we could make.

She was right. One-hundred percent.

We entered Zion National Park via scenic Zion-Mount Carmel Highway, a truly beautiful stretch of highway. The view of Zion upon exiting the tunnels reminded me of Tunnel View in Yosemite Valley–a striking and metaphorical passage from the ordinary world into paradise.

We pulled into a parking area between the two tunnels to hike Canyon Overlook Trail, an easy to moderate 1 mile hike. Parents should keep an eye on small children here as some sections of the trail are narrow and exposed. The views at the end are incomparable.IMG_20140619_142038

IMG_20140619_151516
Hiking Canyon Overlook Trail, Zion National Park
IMG_20140619_154451
View from the top, Canyon Overlook Trail, Zion National Park

We also stopped at Checkerboard Mesa before driving the winding road to the Visitor Center. With our Junior Ranger packets in hand and newfound plans to hike the Narrows, we had but a few hours left to make it to Zion Adventure Company to rent our gear! Luckily, Zion Adventure Company was located just a few minutes from the park entrance. For $14 each, we were able to rent hiking sticks and neoprene socks. We opted to use our own footwear for the Narrows, but the company also offers a $23 warm water rental package that includes canyoneering shoes in addition to the stick and socks. Note that all rentals require you to view a 10 minute Narrows Safety video.

We caught the Zion shuttle to Sinawava Temple bright and early the next morning. The 45-minute drive brought us to the Riverside Walk we’d originally planned. Half a mile along this paved trail brought us to the beginning of the Narrows Trail, which is where the real fun began.

IMG_20140620_090515
Temple of Sinawava, Zion National Park
IMG_20140620_095058
Beginning of the Narrows, Zion National Park

Walking upstream though the Virgin River was unlike anything we’d ever done before. We watched lush moss-covered rocks give way to intricately carved, towering canyon walls. For all the people traversing the trail with sunscreen and the like, the water itself appeared unsullied and clear. Stones and pebbles marked a colorful path beneath the river’s surface. We stopped often to admire the “weeping walls” and the interplay of light and shadows along the narrow canyon walls.

IMG_20140620_120237
Hiking the Narrows, Zion National Park
IMG_20140620_100416
A “weeping wall” in the Narrows, Zion National Park

The kids had a blast–this hike was simultaneously more challenging and a hundred times more memorable than any hike they’d done before. At times, the water levels found our youngest chest-deep in icy water, but he took the dunking in stride. All three enjoyed the challenge of navigating the current and slippery riverbed rock. My husband took to pointing out “rock maps” to help our youngest find the shallowest path through the river. He shouted out rock colors or shapes to follow, a routine our son loved.

IMG_20140620_102234
Taking a break, the Narrows, Zion National Park
IMG_20140620_122656
The Narrows, Zion National Park
IMG_20140620_122801
On the way back to the trailhead, the Narrows, Zion National Park

For those considering this hike with children, there are many natural resting spots–some along sandy beach-like areas and others along rocky coves. Also, because it’s an out-and-back trail, you can venture as far as you have time (or legs!) for and easily retrace your steps back. We found it took us much longer going up-river than down, though I’m unsure whether this had more to do with the current, the initial cold (we started the hike at 8 am, pre-canyon sun), or our frequent stops to admire the scenery. All told, we hiked a little over 7 hours, 6.5 miles total, stopping for crackers, salami, and cheese several hundred yards into the Park Avenue/Narrows stretch of the trail. There is a closer turnaround point about a half mile earlier (2.5 miles from the mouth of the canyon; this where the canyon branches off into Orderville), but we had our heart set on seeing the Park Avenue section, so we pressed on. The kids never complained once; in fact, it was the kids who insisted we continue on.

The next day, we managed to squeeze in a hike to Upper Emerald Pool (about 3 hours roundtrip), a quick stop at Court of the Patriarchs, and ice cream at Zion Lodge before bidding a sad goodbye to this beautiful park.

Our Narrows hike might have taken an entire day, but the quality and depth of the experience imparted such meaning to our time at Zion that I wouldn’t have had it any other way. As a very wise mom once told me: Trust me. You need to do the Narrows.

Tell me: Have you visited this amazing park? What’s your favorite Zion memory?

Tips for Families Hiking the Narrows:

  • Dry sacks: You’ll want these to keep your electronic devices and belongings dry. In a pinch, Ziploc freezer bags will do (this is what we used), but you may want to consider renting a dry bag from your Narrows outfitter.
  • Rent Appropriate Gear: You could attempt this hike without neoprene socks, but I wouldn’t advise it, especially for children. We were cold with neoprene socks and can’t imagine how uncomfortable it would’ve been to attempt this hike without them.
  • Leave No Trace: No digging catholes along the sandy beach areas; all waste must be packed out. It would be wise to come prepared with plastic bags and wipes.
  • Just do it!: Even if you can only walk a mile up the Narrows, your experience will be well worth the effort. Hiking in allows you to experience this slot canyon in a way that viewing it from the mouth of the canyon cannot.
  • The Gift of Time: Allow yourself enough time to enjoy and embrace the experience. It wouldn’t be unreasonable to block off an entire day for this hike, especially if you have small children who may not be able to move as quickly. The hiking will be slow-going but incredibly rewarding.


Bryce Canyon: Heavenly Hoodoos

Standing at just 55 square miles, Bryce Canyon may be considered small by national park standards, but don’t let its size fool you: this park is huge on adventure. In 2014, we spent two and a half adventure-filled days at Bryce Canyon, en route from Capitol Reef National Park to Zion. We caught our first glimpse of Bryce Canyon at twilight; the sun’s last rays bathed the hoodoos in soft pink light.

IMG_20140617_200452
Sunset Point, Bryce Canyon

We stood transfixed at Sunset Point, watching the mysterious rock formations fade into darkness.IMG_20140617_204221IMG_20140617_203551

IMG_20140617_202540
Sunset Point, Bryce Canyon 2014

Bryce Canyon is not an official Certified International Dark Sky Park, but it remains home to some of the nation’s darkest skies. We were thrilled to sit in on a ranger-led Night Sky Program at Bryce Canyon Lodge. Unfortunately, our evening there was marred by cloudy, overcast conditions. The rangers waited to see if the sky would clear after their lecture, but they were eventually forced to cancel the scheduled outdoor telescope viewing. They apologized to the disappointed crowd, saying that weather cancellations were so rare, they only occurred a few times a year. Determined to turn lemons into lemonade, we walked back to Sunset Point and stargazed on our own. Sure, it took an hour to coax feeling back into our frozen hands and cheeks, but the experience was well worth it!

Day 1:

We started the next morning with a hearty breakfast at Clarke’s Restaurant. I can’t recommend this place enough–family friendly, warm service, and generous portions.

IMG_20140619_071419
Clarke’s Restaurant, UT; their thick-sliced bacon can’t be beat!

We spent the morning hiking the 3 mile Navajo/Queen’s Garden Combination Loop. Detailed information about the hike can be found here. Superlatives like ‘amazing’ or ‘incredible’ just don’t do justice in capturing the wonder of descending into the amphitheater for the first time. IMG_20140618_093511IMG_20140618_115330

IMG_20140618_095656
Hiking Navajo/Queen’s Garden Loop, Bryce Canyon National Park

Each turn captured the hoodoos at a different angle, each step more spectacular than the last. Standing at the base of the towering hoodoos was particularly humbling; it seemed impossible that these gravity-defying formations could have been carved by water, wind, and time alone.IMG_20140618_113850

IMG_20140618_100343
At the bottom of Navajo/Queen’s Garden Loop, Bryce Canyon National Park

Our oldest son enjoys sketching and spent time sketching the Queen Victoria hoodoo. We bumped into a woman from Germany who was also sketching Queen Victoria. To our surprise, it was the same woman we had sketched with and spoken to a week earlier, 270 miles away at Arches National Park! She and her husband were touring all five UT national parks like we were. Lucy was particularly kind to our son, taking interest in his art and sharing her own work with him. During our stay, we had the good fortune of running into several couples and families doing the same loop as us at several different parks.

IMG_20140618_102029
A friendly, familiar face. Queen’s Garden trail, Bryce Canyon 

We stopped at Thor’s Hammer and attempted to recreate my trust Fodor’s Complete Guide to the National Parks of the West cover.

IMG_20140618_115042
Close, but no cigar. Thor’s Hammer, Bryce Canyon
IMG_20140618_114804
Thor’s Hammer, Bryce Canyon National Park


The park offers incentives to those who complete 3 miles or more on sanctioned hoodoo hikes. Visitors are encouraged to take rubbings of benchmarks at the end of each hike or photos of themselves next to these benchmarks. We were happy to receive a keepsake magnet to add to our growing collection of National Parks refrigerator magnets.

We spent the afternoon driving the Main Park Road. A great tip I read in Fodor’s guidebook was to drive to the southern end of the park and stop at the overlooks on the way back since they’re all located on the east side of the road.  We picnicked at Yovimpa Point and slowly worked our way back to Fairyland, stopping to enjoy the sights at each overlook.

IMG_20140618_125751
Lunch at 9,000 ft, Yovimpa Point, Bryce Canyon National Park
IMG_20140618_134429
Natural Bridge, Bryce Canyon National Park

We ended our day with a cowboy dinner show at Ebenezer Lodge. The kids were fond of the roasted peanuts, and everyone enjoyed the delicious barbecue. I booked the reservation expecting a kitschy, cheesy show, but the singing and entertainment were surprisingly first-rate. If you’re planning a visit with kids, I’d highly recommend a stop here.

 Day 2:

We divided and conquered on Day 2. The kids and husband were not keen on the prospect of horseback riding into the canyon, so they decided to complete their Junior Ranger packets and explore the Visitor Center while I braved the Canyon Trail Rides horses alone. It was my first time riding a horse that wasn’t hand-led by a trainer. It was also my first time descending 800 feet on horseback. Turns out, this Hawaii girl is terrified of heights. And death, apparently, as my horse seemed hell-bent on hugging the cliff edge of the trail. Our guide assured us this was normal, but this means little when contemplating an 800 foot tumble to certain death. Eventually, I eased into the ride and found myself enjoying beautiful Peek-a-boo Loop.

IMG_20140619_101548
Sadly, this is the only shot I have of my horse ride. I couldn’t bring myself to release the reins. Notice the very calm, unfazed 7-year-old in front of me. 😀

Going up was much easier than coming down, and I was able to truly appreciate the unique beauty and solitude of Bryce Canyon on horseback. Our guide pointed out bristlecone pines  and various hoodoo formations and was vigilant about keeping our group together. If you ever have the chance to spend some time at Bryce, I’d highly recommend a horse ride with Canyon Trail Rides.

After lunch, we hiked an easy 1 mile trail to Mossy Cave at the north end of the park. The color contrast between the hoodoos, sky, and water was striking. The cave itself wasn’t particularly memorable, but the journey there certainly was.

IMG_20140619_120555
Enter a caption

IMG_20140619_122221

IMG_20140619_121201
Benchmark at Mossy Cave, Bryce Canyon National Park

Our time at Bryce Canyon came to an end all too quickly and remains one of my all-time favorite national parks. Tell me: what’s your favorite Bryce Canyon memory? 

Tips for Families:

  • Hiking: to the extent that you’re able to hike, be sure to get out there and do it! Even dropping a few feet down into the amphitheater gives you a far different perspective than standing at the rim. The hoodoos are beautiful from the scenic view points, but there’s so much more to see and appreciate than meets the eye.
  • Dress in Layers: Bryce Canyon is situated at a high elevation, so even in the summer, night time temps often dip into the 40’s and below. Daytime temps can warm into the 80’s. Easily removed layers are your best defense against both extremes.
  • Participate in Evening Ranger Talks and the Junior Ranger program: Kids (and adults) will reap so much more from the experience through these programs. Guided telescope viewing is available during the summer, and there are even guided full-moon hikes that look amazing. See the NPS site for more details.
  •  Pack a lunch: Bryce Canyon has lots of great picnic spots. There’s nothing better than enjoying a meal with magnificent Bryce Canyon as your backdrop. You may also want to pack saltier snacks such as crackers and salted nuts; we found that the higher altitude made us crave salt.